Unlock Your Voice
We highly value customers opinion and feedback. To help more customers understand the quality of our products and services, we sincerely invite you to share your valuable experience on Trustpilot.
Ready to buy or need advice?
We're here to help! Our sales team offers personalized consultations, and expert advice to help you make the right choice.
Features:
Specification:
OE number: 53031576 53031576AD 3970085 AP63427 53031575 53031575AH 3970084 AP63428 56028184AB
Fits: 1999 2000 2001 2002 2003 Dodge Ram Cummins Diesel Pickups
Package List:
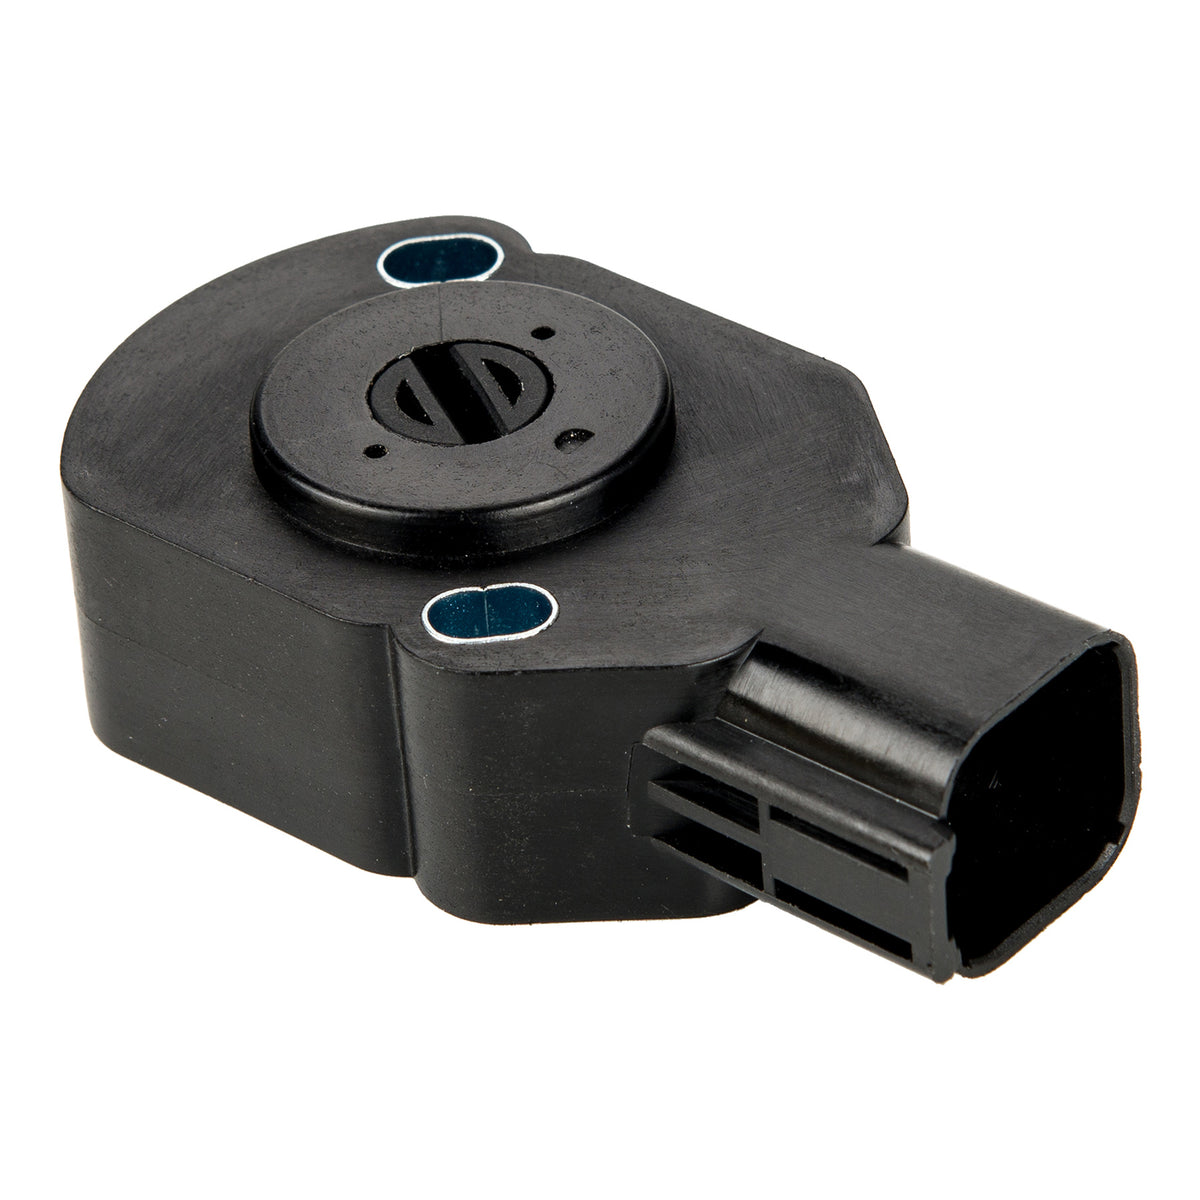
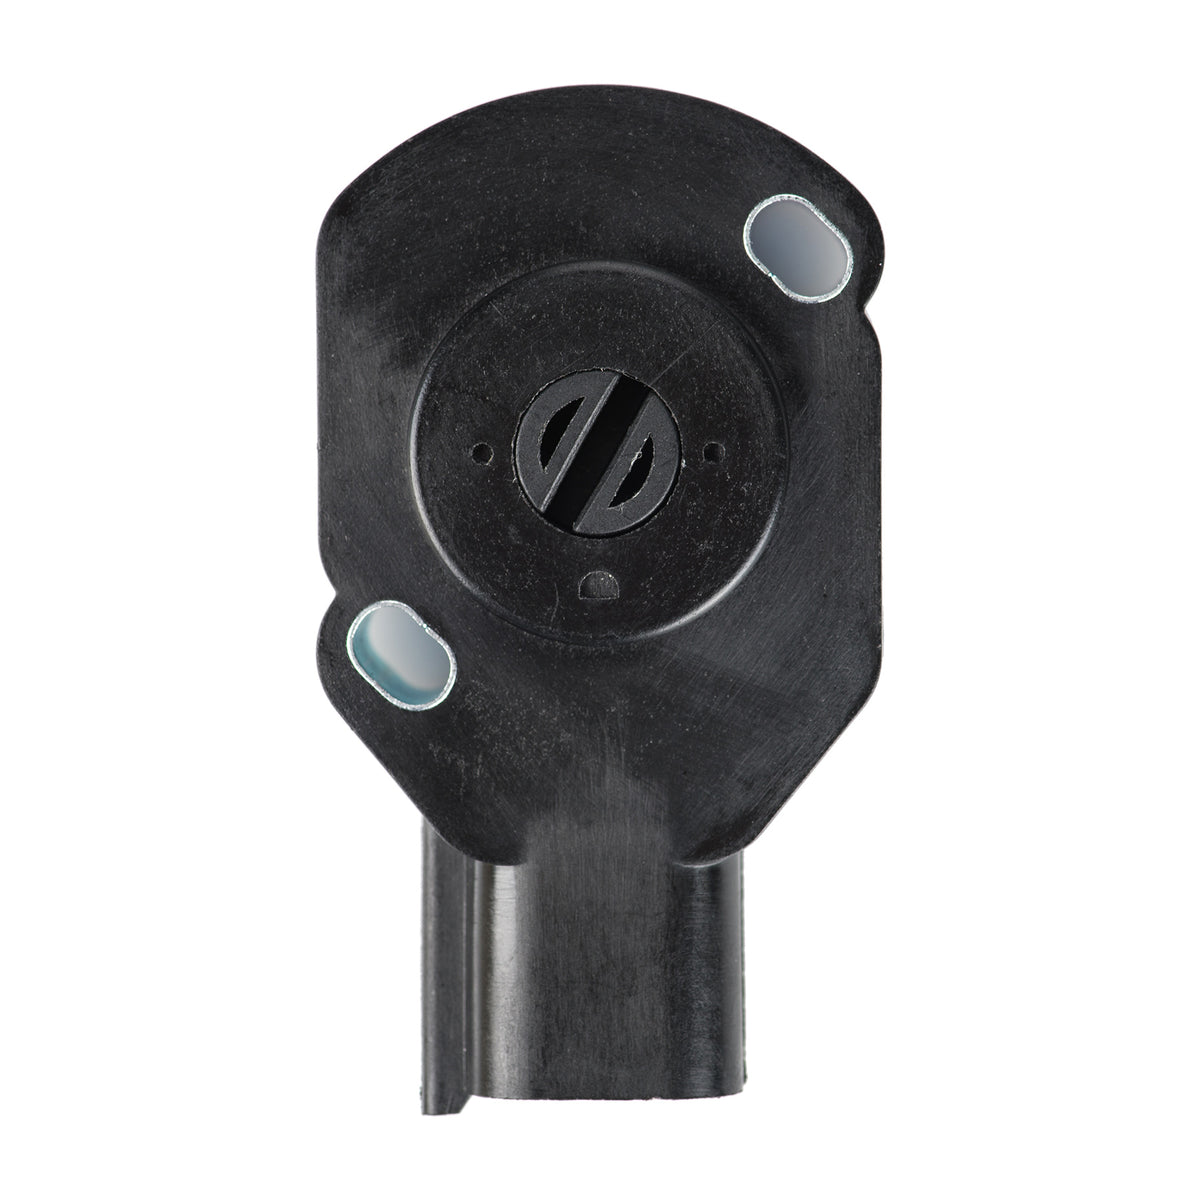
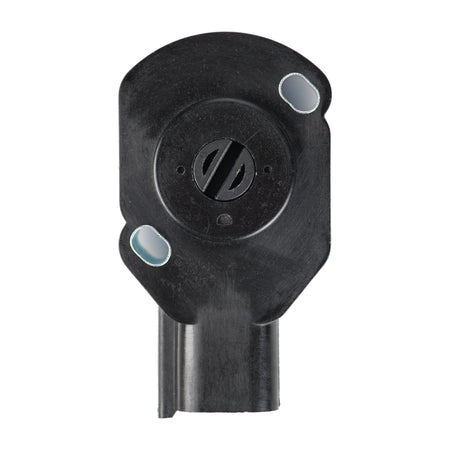
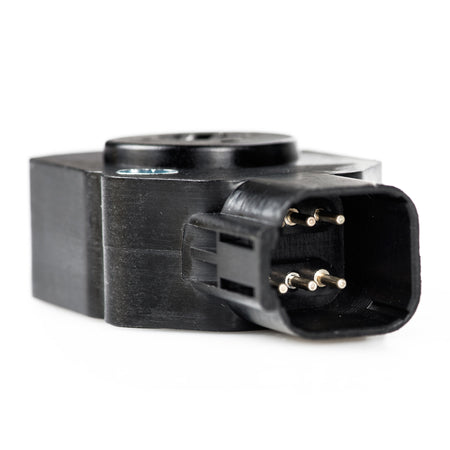
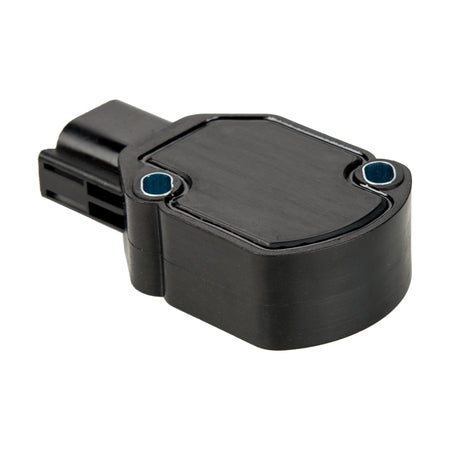
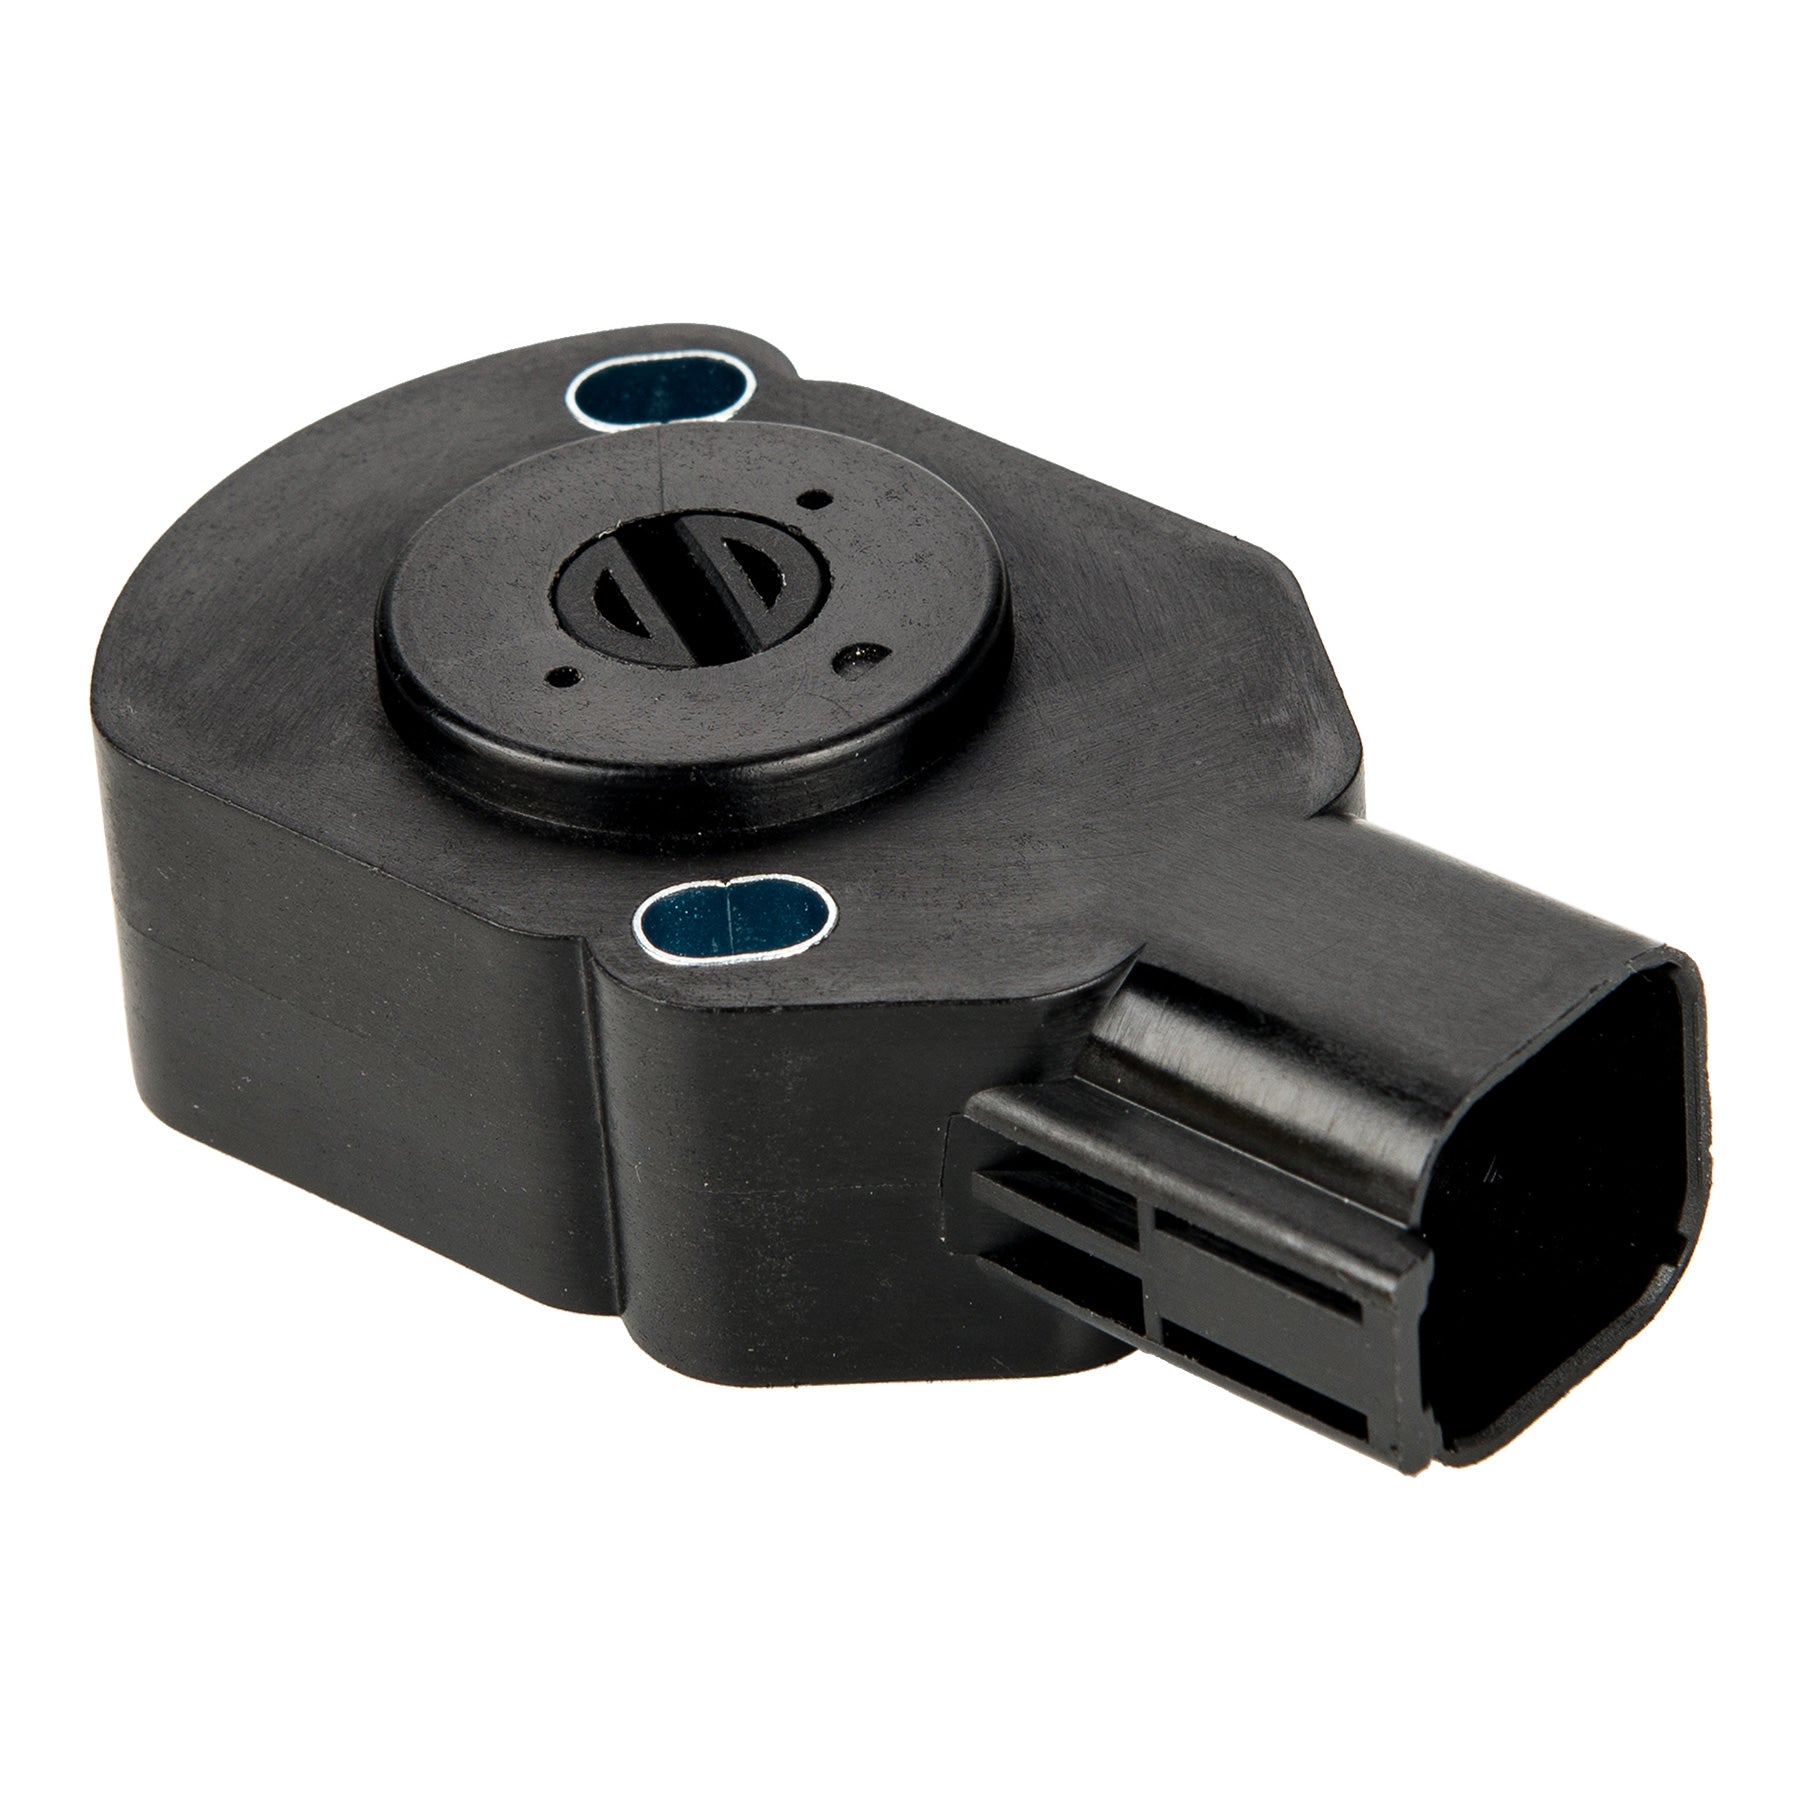
1 x Throttle Position Sensor

ORION MOTOR TECH Throttle Body Position Sensor
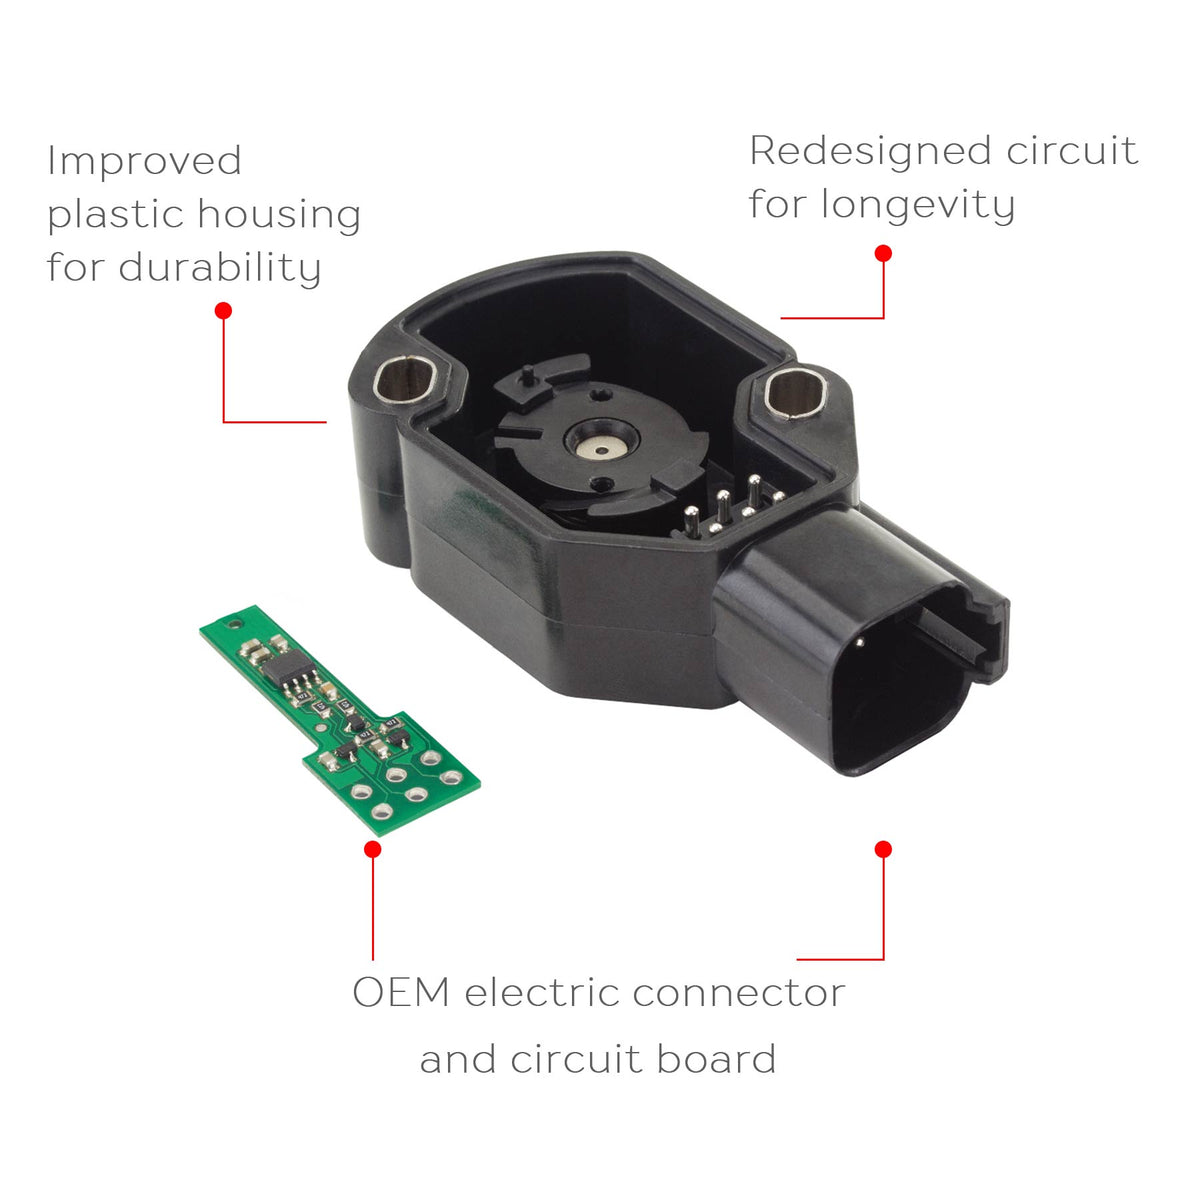
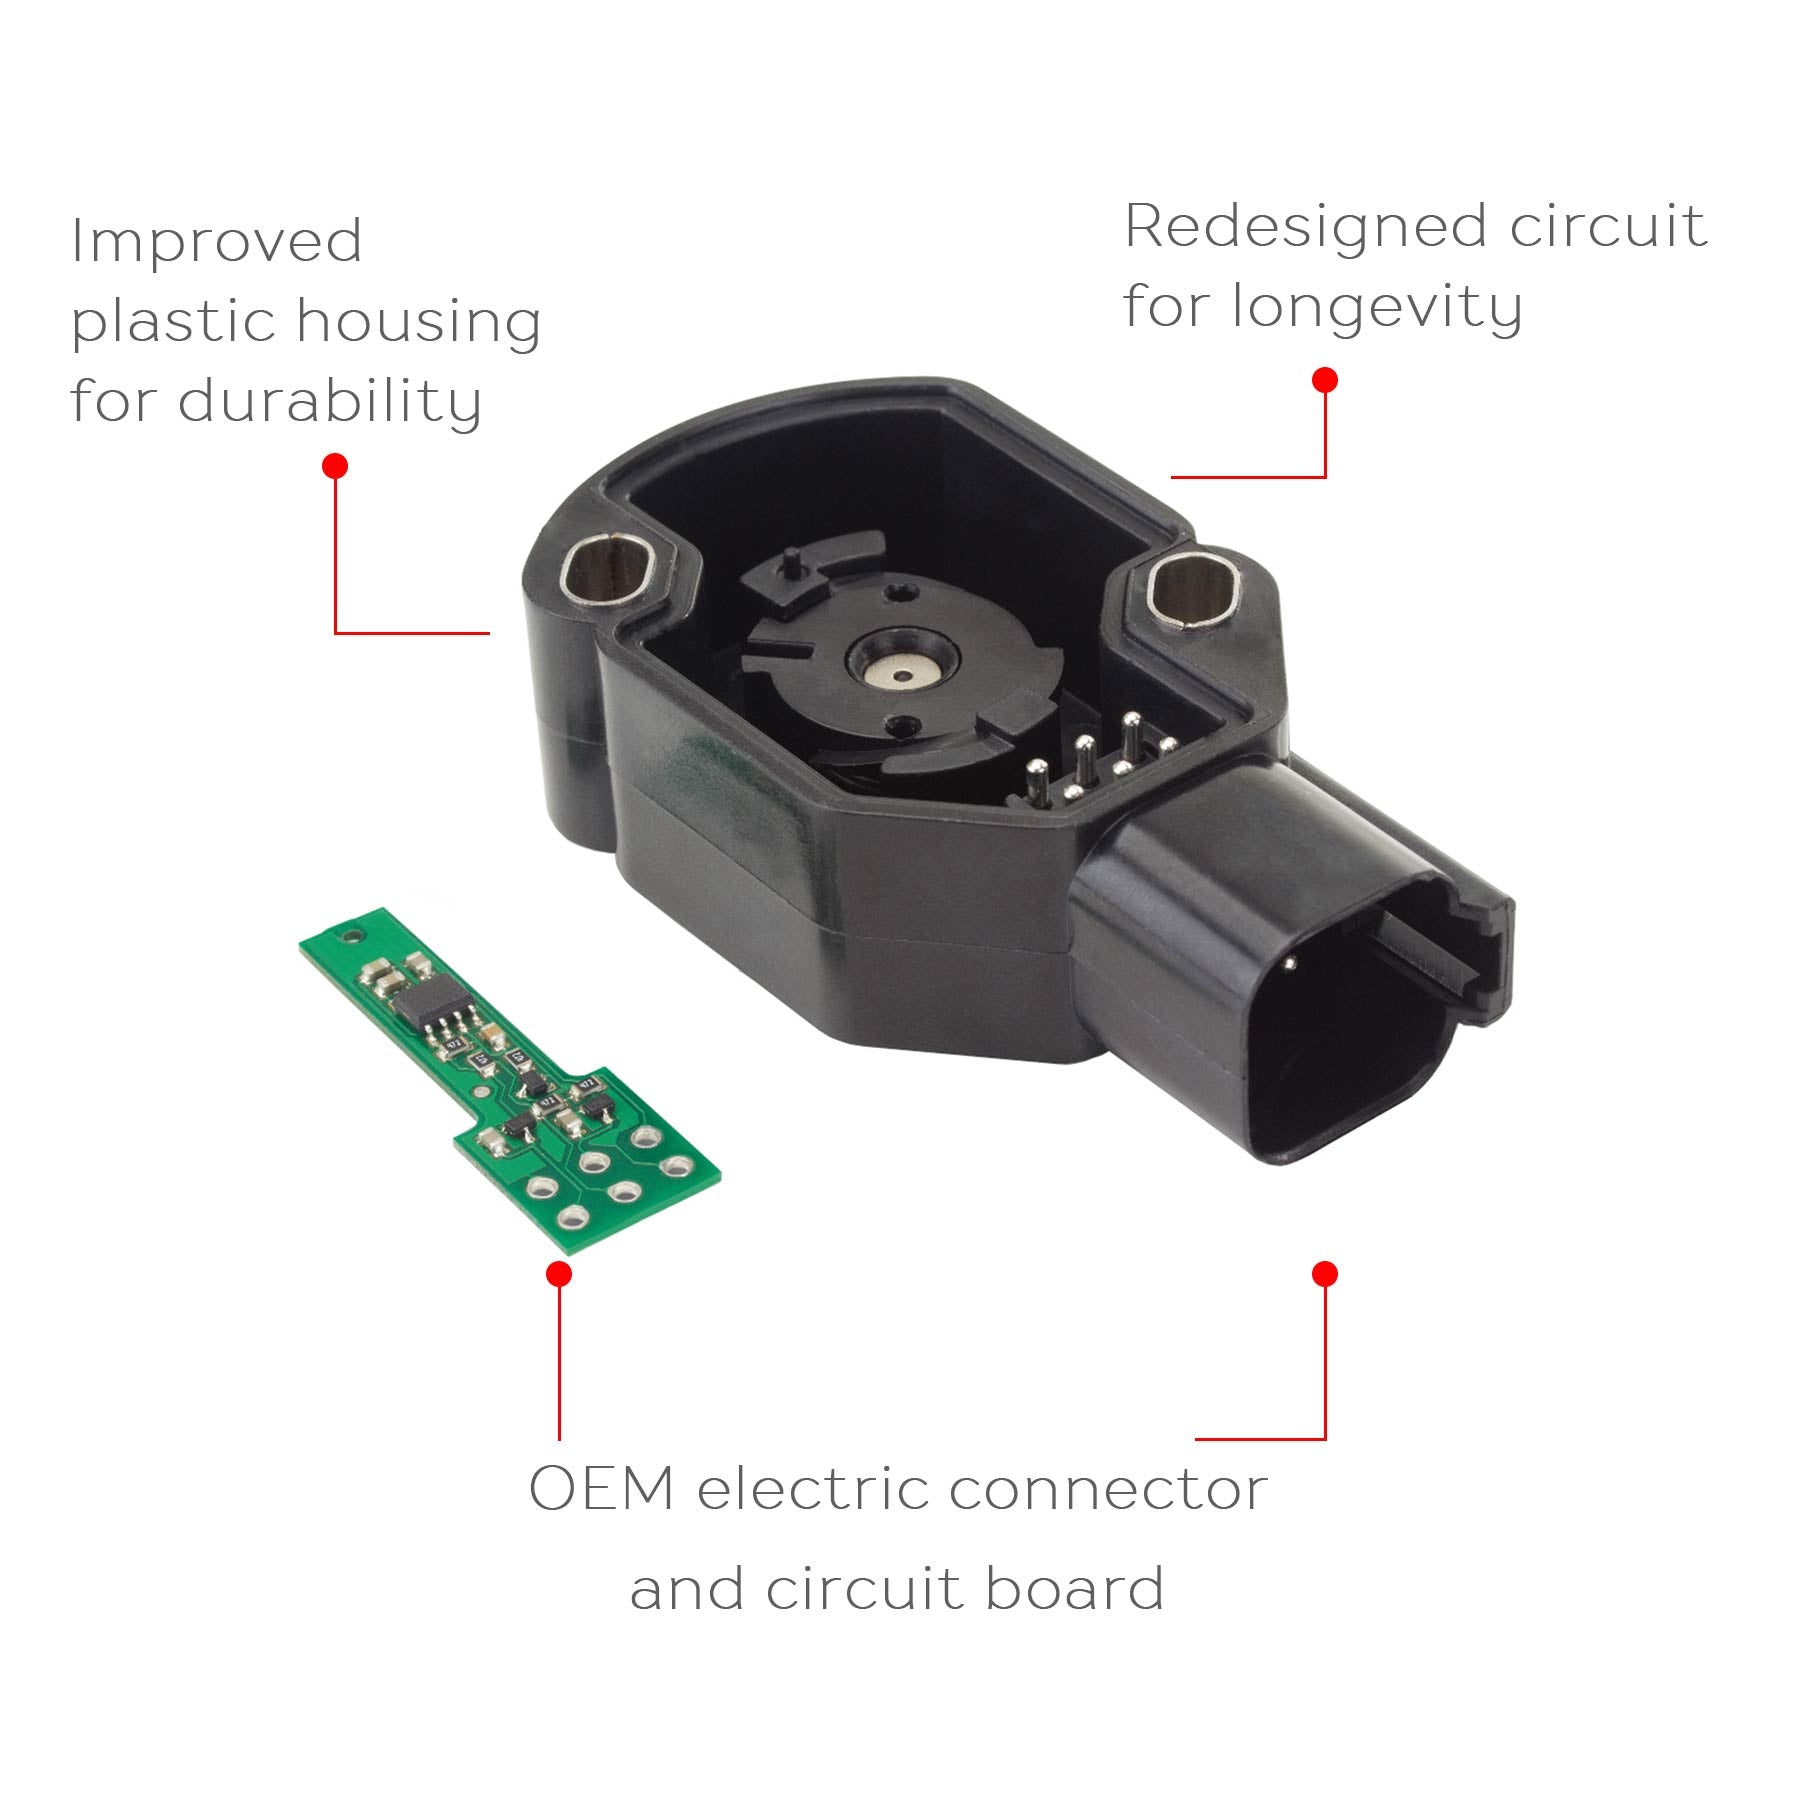
When you want to get OEM quality without the high dealer cost, Orion Motor Tech is the right choice for you. Today you can fix your vehicle properly and have money left in your pocket with a Orion Motor Tech product. It will look, function, and fit just like the part from the dealer, so your vehicle will operate as it should or even better. The Orion Motor Tech product is designed using state-of-the-art technologies to exactly replicate the OEM unit, then it is manufactured with modern tooling so that the end product looks and fits exactly as designed. The unit is made to the same dimensions as the OEM part with the same gauge material. Orion Motor Tech is confident in the quality of their products, which is why the company covers them with a limited lifetime replace or return commitment against any defects in materials and workmanship. Easily restore the appearance and function of your vehicle with Orion Motor Tech products.

The throttle position sensor gives information to the ECM (Engine Control Module) about the position of the pedal determining the speed at which the driver is pushing on the accelerator pedal. It is located at the front driver side of the engine inside the bell crank assembly housing in between the cylinder head and batter.
If your Dodge Ram is having problems in idling, speed falls off suddenly, check engine light pops up you are getting codes P2121, P0121, P0122, P0123 then you may have a problem with your throttle position sensor.
This replacement TPS manufactured by Orion Motor Tech can be easily installed. In order to properly install the replacement sensor be sure the voltage of the TPS is set to 0.55v+ before locking in its position. Once set, turn the engine on and slowly push the accelerator pedal to the floor and back (only once) to make sure that the ECM learns the TPS calibration. More installation details are available upon request.
Fits the Following Vehicles
1998-2003 Dodge Cummins 5.9L ISB with VP44
2003-2004 Dodge Cummins 5.9L ISB with Common Rail
1998-2007 Dodge Ram 2500 5.9L 359Cu. In. l6 DIESEL OHV Turbocharged
1998-2002 Dodge Ram 2500 5.9L 360Cu. In. V8 GAS OHV Naturally Aspirated
1998-2002 Dodge Ram 2500 5.9L 5899CC 360Cu. In. V8 GAS OHV Naturally Aspirated
1998-2002 Dodge Ram 2500 5.9L 5899CC 360Cu. In. V8 GAS SOHC Naturally Aspirated
1998-2007 Dodge Ram 3500 5.9L 359Cu. In. l6 DIESEL OHV Turbocharged
1998-2002 Dodge Ram 3500 5.9L 360Cu. In. V8 GAS OHV Naturally Aspirated
1999 Dodge Ram 3500 5.9L 5899CC 360Cu. In. V8 GAS OHV Naturally Aspirated
Replaces Part Numbers:
|
|
|
|
|---|---|---|
Tools Required:- Scan tool with data display capabilities or digital voltmeter - Philips screwdriver - 10mm socket - T-20 Torx socket - Ratchet |
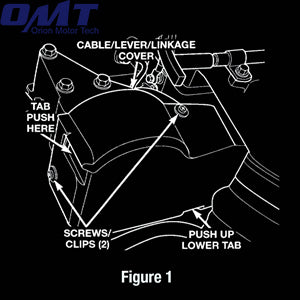
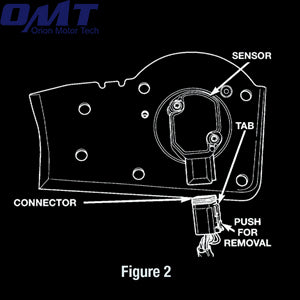
Removal:1. Disconnect negative battery cables at both batteries. 2. Remove cable cover by first removing the (2) Philips screws and prying out retention clips. Then push rearward on front locking tab and upward on lower locking tab. (Figure 1) 3. Remove (6) mounting bolts and partially remove throttle position sensor (TPS)/accelerator pedal position sensor (APPS) assembly from engine. Rest TPS/APPS assembly in a secure location without placing strain on the electrical connector or cables. Cables do not need to be removed from bracket assembly. 4. Disconnect electrical connector from bottom of sensor by pushing on connector tab. (Figure. 2) 5. Remove (2) Torx screws. Remove sensor. |
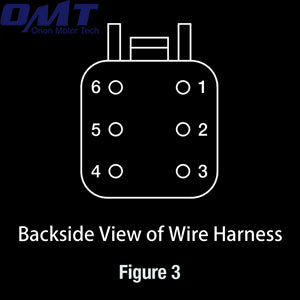
Installation:1. Install electrical connector on new sensor. 2. Install sensor into TPS/APPS assembly using (2) Torx screws and washers. Reuse washers from previous sensor. Do not tighten screws all the way. A good rule of thumb is to start with the sensor in the same location as the previous sensor. 3. Connect negative battery cables at both batteries 4. TPS/APPS Calibration: Turn key to ON position. Do not start engine. Monitor the TPS/APPS voltage using a scan tool or a voltmeter on Pin 3, labeled on the connector. (Figure 3) Rotate sensor clockwise or counter-clockwise so the TPS/APPS voltage is between 0.50V - 0.60V or 10% - 12%. Tighten (2) Torx screws when sensor is positioned correctly. After screws are tightened, verify TPS/APPS voltage is still in range. Readjust as needed. Turn key to OFF position. 5. Position assembly to engine and install (6) bolts. Tighten bolts to 12 Nm (105 in. lbs.) torque. 6. Install cable cover. |
Orion Motor Tech ships within the contiguous 48 U.S. states. For Alaska, Puerto Rico, and Hawaii, please contact us for a custom shipping quote. Free ground shipping is not available for these locations.
Orion Motor Tech processes your orders within 24 hours on weekdays. Orders with verified payment are usually processed the same business day. You’ll receive an email confirming your order, followed by a shipping notification with tracking information once your order ships.
Delivery within the contiguous U.S. typically takes 3–7 business days, depending on location. Delivery times may be longer during holidays.
If you need to update your shipping address after placing an order, contact us immediately at support@orionmotortech.com. Changes may result in additional shipping fees, which must be approved before we update your shipment. Without approval, the order will ship to the original address.
Please inspect your shipment upon arrival. Report any damaged or missing items within five business days to support@orionmotortech.com. Keep the packaging and take photos if items are damaged—this helps us process your claim quickly.
We use secure packaging to protect your items during transit. External box damage doesn’t affect your right to report product issues. Some packaging may be recycled and have unrelated markings.
Items may ship separately if they are from different warehouses. This allows us to get parts of your order to you faster.
For any shipping questions, email support@orionmotortech.com.
Thank you for shopping at Orion Motor Tech! If you are not entirely satisfied with your purchase, we’re here to help. If you are not completely satisfied, or the product or any parts are found to be defective, you may return the item to us in its original condition within 30 days of receipt.
If there is a problem with your purchase, please contact our staff with your receipt within three months of receiving the products. We will exchange defective parts for you free of charge. We aim to make you satisfied, and our customer service team will provide a pleasant after-sales experience.
Contact Us: support@orionmotortech.com
Please contact our Customer Support team to start the return process. Include the following information:
Refunds will be completed within 14 business days after we receive the returned items. Refunds will be issued to your original form of payment (credit card, debit card, PayPal, etc.).
If you decide to cancel your order, please notify us within 24 hours of placing your order. We will issue a full refund within 3–5 business days.
We highly value customers opinion and feedback. To help more customers understand the quality of our products and services, we sincerely invite you to share your valuable experience on Trustpilot.
It took me several weeks to find a 23 piece kit an some how I got a 10 piece kit on your behalf still not happy
This kit doesn’t have attachments i was looking for
I used it on 2017 Ford transit 250 Tool itself is great helper and I believe that it has the sturdiness needed it for the job it is made for. It does not have any instruction, probably because it is mainly used by professionals only, so regular lesson may struggle a little too correctly assemble and also use it to the point that it evil be bent or damaged beyond use. First and foremost, keep in mind, that you not trying compress the poison, it must be wind only and direction off winding is different for passenger and driver side (caliper has imprinted arrow to navigate you which direction to use). Also keep in mind, that you compresing brake fluid trough combination of rubber and metal tubing with tiny diameter inside = you will feel the resistance!! Before you start the winding back open brake fluid reservoir to allow three compressed fluid go back in much easily. Now at some point you may feel, that it won't continue winding = strong resistance, so wait a little, adjust the tool again so it will not be too tight or too loose and try again..... it will continue again smootly. If you feel strong resistance once again,.. wait adjust and keep going again. With enough patience and your sensitive hands tool will work flawlessly as it is designed. I strongly disagree with person who bent this tool doing same job as me, it's not the tool fault! it's the human factor again and again..... This tool will do compresing or winding, you just have to know what your caliper need and hose to use this tool. 2-25-2020 Correcting: instruction is actually included inside of the box, just was ignored at the moment of first look and eagerness to try it out. Also I tested on 4 human beings ability of using the tool not knowing what it is or does. Age differences were from 7-43Y old. All received same simple info and task. 1rst task: they had to pick only 3 pieces from the box, which are needed it for the tool to function. Result = all failed 2nd task: assemble toll from the 3 pieces and make it functional Result=all succeeded in time line from 1-15 minute. 7Y old boy need it 15minutes for assembly 9Y old boy need it 1+minute 11Y old girl need it about 13 minutes Grown up women need it only 5 minutes, so adult men, who is complaining about not being able to solve it without another adult should not write negative rewiew....., especially when instruction is included. Enjoy the video of small boy to show you how to assemble it correctly.
The tubing was fine but adapters supplied to attach to bleeder valve are not suitable for my ATV bleeder valve. Too large!!! Although the kit is well supplied with adaptors the smallest adapter was not able to create a proper seal to create enough vacuum to pull fluid through system. If only the kit included a type of reducing connector from the supplied tubing to a smaller diameter tubing the kit would work better. And perhaps an additional smaller connector.
I used it on 2017 Ford transit 250 Tool itself is great helper and I believe that it has the sturdiness needed it for the job it is made for. It does not have any instruction, probably because it is mainly used by professionals only, so regular lesson may struggle a little too correctly assemble and also use it to the point that it evil be bent or damaged beyond use. First and foremost, keep in mind, that you not trying compress the poison, it must be wind only and direction off winding is different for passenger and driver side (caliper has imprinted arrow to navigate you which direction to use). Also keep in mind, that you compresing brake fluid trough combination of rubber and metal tubing with tiny diameter inside = you will feel the resistance!! Before you start the winding back open brake fluid reservoir to allow three compressed fluid go back in much easily. Now at some point you may feel, that it won't continue winding = strong resistance, so wait a little, adjust the tool again so it will not be too tight or too loose and try again..... it will continue again smootly. If you feel strong resistance once again,.. wait adjust and keep going again. With enough patience and your sensitive hands tool will work flawlessly as it is designed. I strongly disagree with person who bent this tool doing same job as me, it's not the tool fault! it's the human factor again and again..... This tool will do compresing or winding, you just have to know what your caliper need and hose to use this tool. 2-25-2020 Correcting: instruction is actually included inside of the box, just was ignored at the moment of first look and eagerness to try it out. Also I tested on 4 human beings ability of using the tool not knowing what it is or does. Age differences were from 7-43Y old. All received same simple info and task. 1rst task: they had to pick only 3 pieces from the box, which are needed it for the tool to function. Result = all failed 2nd task: assemble toll from the 3 pieces and make it functional Result=all succeeded in time line from 1-15 minute. 7Y old boy need it 15minutes for assembly 9Y old boy need it 1+minute 11Y old girl need it about 13 minutes Grown up women need it only 5 minutes, so adult men, who is complaining about not being able to solve it without another adult should not write negative rewiew....., especially when instruction is included. Enjoy the video of small boy to show you how to assemble it correctly.
My motorcycle.
Worked perfectly
Excellent quality. I used it to replace the ball joints on my Dodge Ram 1500, and it worked perfectly. It made the job much easier and more efficient. Highly recommended.
Good quality kit, had everything I needed to remove and install new ball joints in my Grand Cherokee ZJ; the plastic case it comes in is super nice and the overall quality of the product is very high, just make sure to grease up the threads on the tool and when removing old ball joints take a mini maul or similar to break them loose from the knuckles otherwise you will damage this tool, eye protection is recommended.
